After opening dfndr security, tap on the “WiFi Security” function.
-In the “Status” section, next to the Wi-Fi name, touch the pencil icon
-If you want to change the name of the WiFi just touch on “Nickname” and type the new name you want.
-Then a map will appear that will locate where the WiFi is located
Finally you can select the category in which desires in which you want to classify your Wifi. For this you just have to tap on one of the options:
- Home Network

- Job Network

- Friendly Network

- Public Network

With this function you will know all the WiFi data where you are connected. In addition, you can do a speed test of your Wi Fi in a few seconds.
Try this new feature now!😁
Downloads Cleaner allows you to clean files from your Android’s Downloads folder to free up storage on your device.
To use this feature, follow the steps below:
1- Open dfndr security, select Tools and tap on “Downloads Cleaner”.
2- You can filter your files by date, type or size by selecting the filter button  , or you can scroll through the Images, Videos, Documents, and Unknown File Format tabs to locate the images you would like to delete.
3- Select the files that you want to remove by tapping on the small checkbox in the top left corner of each file, then select “DELETE” at the bottom of the screen.
5- Select “Confirm” to delete the file(s) and, you’re all set!
REMINDER: Once the deletion has been confirmed, the selected files will be permanently deleted and cannot be recovered.
You can check your subscription status and current plan directly from your device.
To access your subscription settings, follow the instructions below:
- On the Home screen of your iPhone, iPod, or iPad, tap Settings;
- Tap iTunes Store and App Store;
- Touch where your Apple ID and email appears;
- In the popup that will open, tap View Apple ID, enter your account email and password and press OK;
- In the Subscriptions area, tap Manage;
- Choose dfndr security signature that is active
Safe App Installer lets you know if the app you are going to download is safe or not😉
The apps will be rated as Trusted or as Security/Privacy Alert:
o Security Alert: If the app is malware.
o Privacy Alert: If the app already experienced a data breach
o Trusted: If The app is not malware or has never experienced a data breach. Is safe
To use this function:
- Open dfndr security
- Select “Tools”

- Safe App Installer

- Click in Activate now and allow the requested permissions
Important: To use this tool you have to choose to subscribe to the Pro or Ultra Plan.
The Identity Theft Monitoring feature is a fully developed protector of your identity details. We alert you on data leaks, let you know if your accounts are affected, and offer help on what to do if one of your email accounts is compromised.
Here is a complete breakdown 😉
24-Hour Monitoring: We monitor your credentials 24 hours a day, 7 days a week. T
Weekly Status Reports: Every week, you’ll receive a complete report on the security status of your registered accounts.
Data Breach Alerts: If your data is violated and compromised, you’ll receive real-time alerts via email.
To register your email follow these steps:
- Open your dfndr security and go to the side menu.
- Select Identity Theft
- Enter your email address
- A PIN code will be sent to your email. Open your email and search for this code, copy and paste it into the Identity Theft function.
- Select at the bottom of the screen “Add Monitoring”
If you would like to include another email:
- In the “Add Email” part, touch the green button that has a “+”
- Select “Enable Monitoring”
Say you receive an SMS from your mother about a sale at a major store and she leaves a link to a coupon for you to redeem. The message appears convincing, so you click the link and unknowingly introduce malware to your device.
The website verifier is a self-serve tool to get peace of mind before clicking 😉
This indispensable resource reports mobile threats in real-time and has a URL checker that lets you know if a link is safe. The URL checker connects to our proprietary anti-hacking technology that reviews a million URLs daily.
When you receive a message with a link:
There are many possible reasons for this:
- The service may have been acquired by another company.
- The service was rebranded as a different service.
- Someone else signed up on your behalf, or used your email address to sign up.
A data breach is an incident where information is stolen or taken from a system without knowledge or authorization of the system’s owner. Small or large organizations can suffer a data breach. Stolen data may involve sensitive or confidential information such as credit card numbers, or customer data such as email addresses or passwords.
While we keep the database as up-to-date as possible, it contains a subset of the data breach records from the past. There is still the possibility that your email address may have been compromised in a data breach that was never detected or reported to the public, or it may still be compromised in a future breach. It is important to check the Identity Theft Report feature regularly to ensure that your account stays secure 🙂
Identity Theft Report allows you to check whether your personal email addresses have been compromised in any previous data breaches.
This report lets you know from which data breach your email address has been compromised and informs you of what action to take in order to secure your account and information.
- Open dfndr security
- Select “Identity Theft Report”
- On the main screen, enter your email address and tap “Search Now ”
- Check your e-mail in order to know your PIN Code.
- Write your PIN code in the app
- Allow the system to scan for your email address in our data breach database
- Review the results
If your email address has been identified in a breach and if you are a Premium you will see the results in our comprehensive report. You can select any of the data breaches in the report to learn more about what took place during the breach, and which steps you can take to ensure to secure your account.
You can choose between the Annual Plan or the Monthly plan
Annual Plan $ 19.99
Monthly Plan $ 2.99
To be a Premium user you just need to click on the orange button that says:
Try us free for 3 days! You’ll gain the same Premium privileges as a subscriber 😉
If you enjoy your free trial, do nothing and it will automatically convert to a Premium subscription at the end of the trial period.
You may cancel the free trial at any time clicking here
If you cancel your free trial, you will not be charged at the end of the 3-day free trial period.
Our PREMIUM service allows you to check to see whether your email address has been involved in any previous data breaches. It scans email addresses stored from previous data breaches in order to determine whether your email address was part of a breach.
If your email address has been identified in a breach, you will see the results in our comprehensive report. You can select any of the data breaches in the report to learn more about what took place during the breach, and which steps you can take to ensure to secure your account.
Here is a complete breakdown 😉
24-Hour Monitoring: We monitor your credentials 24 hours a day, 7 days a week.
Weekly Status Reports: Every week, you’ll receive a complete report on the security status of your registered accounts.
Data Breach Alerts: If your data is violated and compromised, you’ll receive real-time alerts via email.
We’re sorry to hear that you chose to cancel your subscription!
A subscription allows you to use the dfndr security’s Advanced Protection features.
You will need to use your own phone to cancel a subscription for purchases made on iOS.
- Select Settings
- Tap your name.
- Tap Subscriptions.
- Tap dfndr security
- Tap Cancel Subscription.
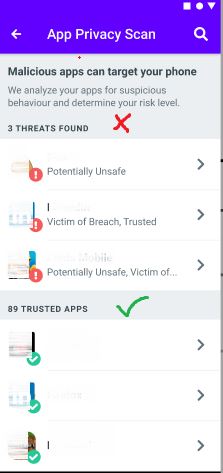
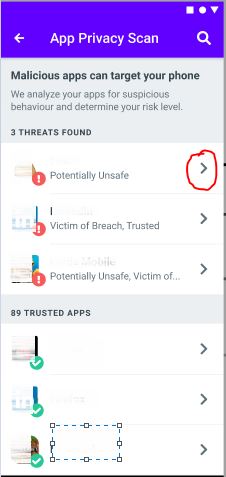
If you are a Premium user and have version 5.32 (or more) of dfndr security installed on your cell phone, you can use the function of Privacy Protection that trace where apps send your data and check which app could be a risk to your privacy.
To activate this function, on your phone click here or follow the steps below::
-Open dfndr security.
-Select the Tools window
-Select: Privacy Protection
The list of applications that you have installed on your cell phone will appear and the apps that are a possible threat will top the list.
If you want more information about the app you just have to select the arrow on the right side of the app:
Our Monitoring Widget provides quick access to our app and to the functions of: Boost, Cleanup, Camera, Flashlight and Battery 
You can activate this function by clicking here or by following these steps:
- Open dfndr security.
- Select the main menu of dfndr security (three horizontal lines on the left side of the screen)
- Select Monitoring Widget
- Select the type of Widget you want tapping on the option you want active:
Standard Design: Quick access to your dfndr notifications and keep you protected against viruses 24/7
Shortcut Widget-White: Quick access to your favorite tools and keep you protected against viruses 24/7 in white
Shortcut Widget- Dark: Quick access to your favorite tools and keep you protected against viruses 24/7 in dark purple
It is important to have some of these widget enabled to provide real-time protection 
The Identity Theft Monitoring feature is a fully developed protector of your identity details. We alert you on data leaks, let you know if your accounts are affected, and offer help on what to do if one of your email accounts is compromised. Here is a complete breakdown:
24-Hour Monitoring: We monitor your credentials 24 hours a day, 7 days a week.
Weekly Status Reports: Every week, you’ll receive a complete report on the security status of your registered accounts.
Data Breach Alerts: If your data is violated and compromised, you’ll receive real-time alerts via email.
To register your email on your cell phone click here or follow these steps:
1- Open your dfndr Security and go to the side menu.
2- Select Security Control.
3- Select Identity Theft
4-Select at the bottom of the screen “Monitoring”
5- In the “Add Email” part, touch the green button that has a “+”
6-Select “Enable Monitoring”
To use this tool it is necessary to have the ULTRA signature active
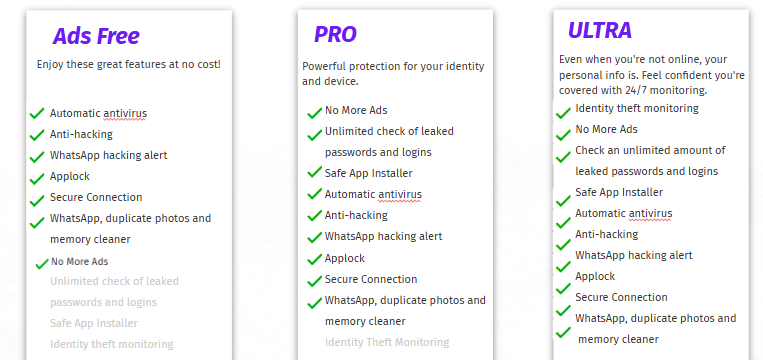
dfndr security subscription plans give you access to enhanced protection tools to keep your phone and personal data even more secure. We offer three subscription options, so you can choose the one that best fits your needs:
-
Ads Free: Enjoy all the features of the free version without any ads for a smoother, uninterrupted experience.
-
PRO: Get everything included in the free version, plus advanced security tools — and of course, an ad-free experience.
-
ULTRA: Our most complete protection plan. In addition to all the benefits of the PRO plan, dfndr ULTRA includes Identity Theft Monitoring.
You’ll receive real-time alerts via email if any of your personal data is exposed in a breach online.
You can find different types of methods to protect your application from dfndr vault.
To choose a type of protection:
- Open your dfndr vault
- Select the main menu ( three horizontal lines)
- Select Settings.
- Select Methods.
Choose the unlock methods:
- Pin code
- Password.
- Patter.
- No one (your application will be without protection of curious people)
If your cell phone has the option of bio-metrics you can also activate the bio metrics system 🙂
To activate these options you just have to touch on the option that you want to activate, register the password and that’s it. Your files are protected.
If you are a Premium user and use Secure Sharing, you can receive and send share invitations from your trusted contacts. =)
- Click the “Share” option;
- Then click on the “Access with invitation” option; With this option, you can access a friend’s secret folder and share the same files.
- Enter the code and then click “Access shared album”;
If you are a Premium user and use Secure Sharing, you can receive and send share invitations from your trusted contacts. =)
- Click the “Share” option;
- Then click the “Create Shared Album” option; With this option, you can create a secret folder and share the same files.
- Enter a name for this folder;
- After the folder is created, you can add files and / or send the invitation.
Thinking even more about the security of our users, we decided to create a secure file sharing method, where you can create a secret folder and share it with anyone you want! =) Is not that amazing ?!
To use this feature, follow these steps:
- Open the dfndr vault;
- Enter your password;
- On the app home screen, click the “Share” tab;
- Now, just click on the “+” circle icon at the bottom of the screen;
- Accept the required permissions and then you can access a folder through an invitation and / or you can create a shared album.
This function stores your files in the cloud. What makes you always have to stop them, even if you lose or change your cell phone 🙂
To use this function, you just have to:
- Open dfndr vault.
- Select the main menu of dfndr vault (three horizontal lines)
- Select Private Manager.
- Select Private Cloud.
Enable the “Enable Backup “option so the files that you save in dfndr vault are stored automatically in the Private Cloud.
You can also activate the “Backup file only over Wi-fi” option. Which serves to backup your files only when you have a Wi-Fi signal and thus not spend the internet of your data plan.
The Decoy Gallery allows you to create a decoy dfndr vault gallery and is one of the features available to Premium subscribers.
You can select a different PIN that triggers the opening of a decoy gallery. If anyone ever asks you to show them to your vault you will have a second option to show them.
Camouflage is a Premium feature that allows you to hide dfndr vault’s app icon from intruders.
With this enabled, you can disguise dfndr vault with an operating system icon such as a browser, calculator, or settings icon.
Break-In Alerts are a Premium feature that allows you to receive photos of intruders who are trying to access your vault.
With this feature enabled, a photo will be taken of any intruders when there is a failed login attempt.
In the Profile section you will have access to the details of your account.
Here you will find:
- The field to write your nickname that will appear when you share your files (the other users will see your nickname)
- The email that you have registered in the app
- Your Plan information.
To access the dfndr vault profile follow these steps:
- Open the app and select the Menu in the top left corner.
- Select “Profile”
You have 2 options:
Select Let’s choose Files: If you want to save your documents and sign in at the same time.
- Accept the permissions.
- Select the files.
- Enter your email or access to your Facebook account or Google account
- Enter your password.
Select Choose Later: To register your account before saving your files.
- Enter your email or access to your Facebook account or Google account
- Enter your password.
- To save your files, touch the + sign
- Accept the permissions.
- Select the files that you want to save
If you already have an account with dfndr vault, to access your files follow these steps:
- Select the “Already have an account” option on the main screen
- Select the option with which you registered the first time (email, Facebook, Google)
- Enter your password
- You will find your files.
*If you slect the email option and you forget the password, then tap on “FORGOT YOUR PASSWORD?”. You will now be prompted for the recovery PIN code (four digits) to proceed. The PIN code was sent to your email at the time of registration, look in your email by: DFNDR vault security PIN
To prevent other people from accessing your apps without permission, you can protect them with a password using the Applock feature. Here’s how:
-
Open the dfndr security app.
-
Go to the Tools tab and tap on Applock.
-
Enter your password or unlock pattern.
-
A list of all your installed apps will appear.
-
Tap the lock icon next to the apps you want to protect.
If you’re referring to the ads within the dfndr security app, please note that they help us keep the app free and maintain its high quality. Our service relies on a dedicated team of developers and a robust technology infrastructure — all provided at no cost to our users.
However, if you prefer an ad-free experience, we offer subscription plans designed just for that. Here’s how to remove the ads:
-
Open the dfndr security app and go to the Menu;
-
Tap on Subscribe now;
-
Select a plan: Ad-Free, PRO or ULTRA;
-
Tap Continue;
-
Enter your payment details and follow the on-screen instructions to complete your subscription.
As part of ongoing policy changes by Google, unfortunately we had to remove the Call Blocker feature from the version 5.21 of dfndr security app.
However, if there is any further change with Google’s policies in the future that will allow this feature to return to our app, we will contact you to let you know.
Please let us know if there are any additional questions or concerns for us. We’re happy to help.
To save battery, this option makes the following settings on your phone:
- Screen brightness 15%
- Screen timeout: 15 sec
- Vibrate: Disable
- Touch Feedback: Disable
- WiFi : Disable
- Bluetooth: Disable
These settings came by default and can not be customized.
To enable it, just tap on the profile you want to activate and touch the blue button until it turns green.
To change the unlock method:
- Open the app and select the Menu in the top left corner.
- Select “Settings”
- Tap on “Security Options”
- Select which method you want to use to unlock your vault: PIN, Pattern, Password, or Fingerprint (on compatible devices).
Cloud storage is a Premium dfndr vault feature which lets you back up an unlimited amount of encrypted files onto your cloud. Free users can still use cloud storage, but they are limited to store only 20 files in cloud backup.
To activate cloud storage
- Open the dfndr vault app and locate the cloud icon in the top right corner and tap on it.
- Select which cloud storage system you want to link to your vault account.
- Tap on the service you would like to use, and then click Allow.
- Wait for the login to complete.
Now whenever you add files to your vault they will also be synced to your cloud storage.
To delete files from your cloud:
- Long press on the file you want to remove. A pop up window will ask you if you want to delete the file from your vault or from your cloud.
- Select where you would like to delete the file from.
- Confirm the deletion.
To reset your PIN or passcode for dfndr vault:
Open the app and tap on the “Reset” option in the top left corner of the login screen.
Select “forgot password? ” option. A login screen will open for you to enter your Google Account information that you used to set up vault.
Select “Send link to the email” and ok 😉
Enter to your email and open the email from noreply@psafe.email
Click on the link to have a new password.
Write your new password.
Now enter the dfndr vault app and select Reset.
Enter your new password and select “Access my Account”
Enter a new Pattern
And that’s it 😉
dfndr vault is an app to keep your files private and only accessible to you.
You can store many types of files in dfndr vault including photos, videos, music and documents.
Once these files are in dfndr vault, they are safe. You’ll need an access PIN code, pattern, or fingerprint to get into the app.
Premium subscribers have even more features available to them including unlimited Encrypted Cloud Backup, Fake PIN, Break-In Alerts, and App Camouflage.
If you want to remove a file from your vault, you have two options: delete it or unprotect it.
To delete a file:
- Long press the file to select it
- Then tap the Trash icon at the top of the screen.
This permanently deletes the file from your vault, and also deletes the file from your device.
To unprotect a file:
- Long press the file to select it.
- Tap on the lock icon at the top of your screen.
Now the file is no longer safe in your vault, but you will still have access to the file on your device.
With a subscription to Premium dfndr vault, transferring your vault files to a new device is easy with your unlimited encrypted cloud storage. Simply follow these steps:
- Add all the files to your vault
- Sync them to your cloud.
- On your new device login to the same dfndr vault account
- Sync the files from the cloud into your vault gallery on your new device
If you are not a premium subscriber, follow these steps to transfer your files:
- Manually select all the files in your vault (long press them).
- Once all files are selected, tap on the small unlocked lock icon at the top of the screen to “unprotect” your files.
- Your files are now back onto your device’s storage, and out of dfndr vault’s gallery.
- Transfer your files to the new device however you would like to transfer them (email, text, messenger, etc.).
To import files:
- Open the app and tap on the small “+” icon in the bottom right of the screen.
- Select “Import files” from the new pop up that appears.
- Select which files you want to add to vault.
You can also add images or videos directly to your vault when you take them:
- Tap on the “+” in the bottom corner of the vault home screen
- Select “Take a Photo” to add an image, or “Record a video” to add a video.
To remove a file from vault without deleting it from your phone:
- Tap on the file and then tap on the “unprotect” lock icon at the top of the screen.
- To remove multiple files, long press a file in your gallery to select it then select any additional files.
- Once all files have been selected, tap the lock icon at the top of the screen.
- The files have now been added to your device’s storage.
To delete files off your device completely:
- Tap on the image and then on the trash icon at the top of the screen.
- To delete multiple files, long press an image in your gallery to select it. Select any additional files.
- Once all the files you want to remove from your vault have been selected, tap the trash icon at the top of the screen to delete them.
Notification Cleaner is a feature in dfndr performance that allows you to control which notifications you’ll receive from other apps on your device. This is especially useful if you receive a lot of notifications and want to clean up the amount of notifications you receive.
To activate Notification Cleaner follow these steps:
1 – Open the dfndr performance app and tap on Tools
2 – Scroll down to Notification Cleaner and tap on it
3 – Select Activate
4 – Tap on the Settings Icon in the top right corner, then select which apps you want to have notifications turned off for. Tap on the bell icon and make it blue to have those notifications silenced dfndr performance, or tap on the bell icon to make it grey to still receive notifications for that app on your device.
5 – If you want to disable Notification Cleaner and receive notifications for all your apps again, slide the slider at the top of the page to Disabled
It’s possible that you accidentally activated the Notification Cleaner feature in dfndr performance which turned off your notification alerts.
To disable this feature and receive all notifications again, please follow these steps:
- Open the dfndr performance app and tap on Tools
- Select Tools and tap on “Notification Cleaner” feature.
- Tap on the Settings icon in the top right corner of the Notification Cleaner page
- Toggle the switch at the top of the Settings screen to disabled
Notification cleaner has now been disabled and you will receive notifications for all apps on your device again.
Please remember that you can always review the notifications blocked before cleaning them, and also interact with them.
To review blocked notifications:
- Open dfndr performance > Tools.
- Select Notification Cleaner.
- Tap on the notification you want to see.
To disable the Applock function, which protects your applications with password.
- Open dfndr performance
- Open the “Tools” tab and access the “Applock” feature;
- Enter your fingerprint, pattern or numeric password;
- Touch the “Settings” button at the upper right corner;
- Slide the toggle (ACTIVATED) to the left to disable it, tap on YES to confirm and, it’s done!
If you want to remove any application protected with Applock, open dfndr performance, tap on the Tools tab and select Applock.
1- Enter your pattern (or numerical password).
2- Choose to unlock the applications protected by Applock by sliding the option to the left. To add Applock to apps you want to protect, slide the switch to the right
To lock your applications with Applock, open the dfndr performance app, tap on the Tools tab and select Applock.
1- Login with a Google account. This will be used to reset any forgotten patterns or PINs.
2– Create a pattern (or numerical password) to be your Applock’s access code.
3- Reenter your pattern (or numerical password) to confirm it.
4- On the next screen, toggle the switch to the right for all the apps that you want to lock using Applock.
Now Applock has been activated for your device!

 in the top right corner.
 ) button in the top right corner.